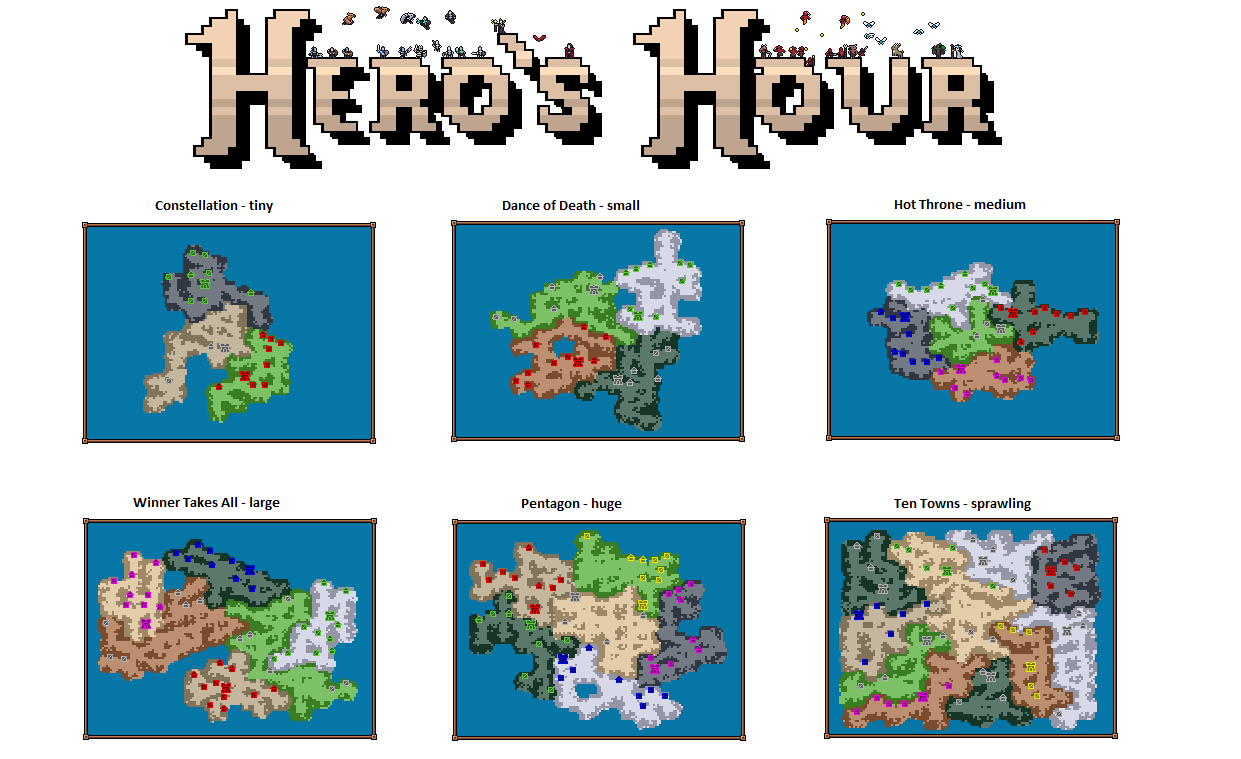
Hero's Hour
Random Map Generation w/ Symmetry and Adventure Objects
Hero's Hour was from the very start based around a random map generator, which has become more sophisticated through the last months and, as of the v.05 update, sports quite an amazing flexibility. This post will explain the methodology, almost a step-by-step guide you can use for your own projects.
But of course, choosing what random/procedural map generator works for your game depends less on technical finesse and more on what your game NEEDS. As for Hero's Hour, it needed these four things:
- Several options for the layout of the map
- Symmetric areas for each player in the game
- Adventure object placement and maneuverable paths
- Dense, unique local areas
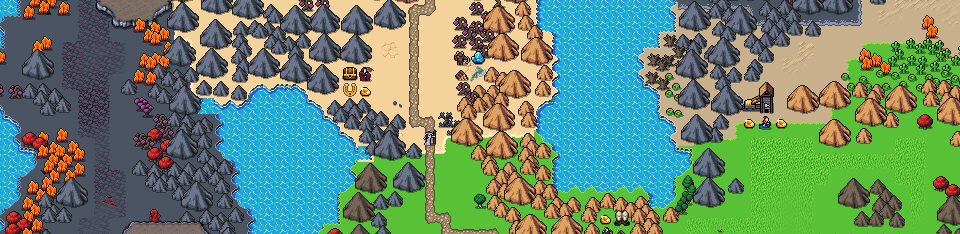
When working on map generation, it's a great idea to have your graphics ready ahead of time. I am of course using the great graphics offered by https://iknowkingrabbit.itch.io/. A whole 'nother devlog could be written about auto-tiling and such things - but this is focused on the more large-scale stuff.
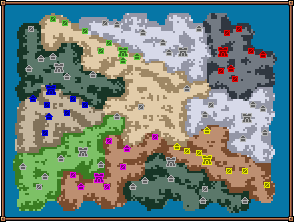
THE GRAND SCALE
On the very broadest scale, a Hero's Hour map is made up from areas and connections.
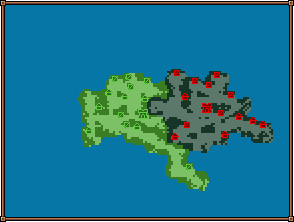
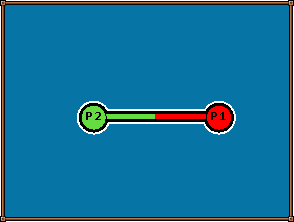
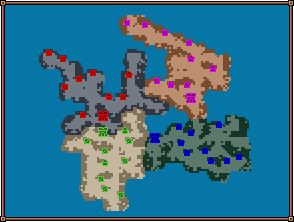
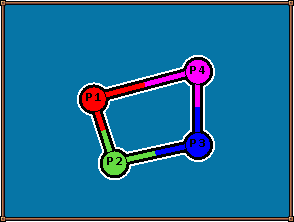
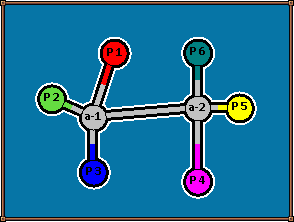
Here you see the final result of the generation algorithm alongside its symbolic form, here for the map "Duel". There are two player starting areas and a connection.
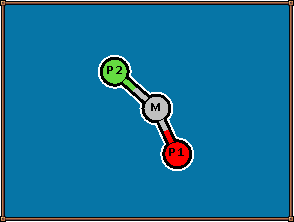
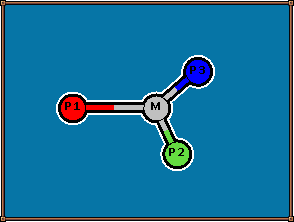
To start with, I defined several different connection algorithms, which would take in a number of players and then spit out a line graph like the one you see above. The least complex of them all I named Simple, which you see above - it simply connects all starting areas with their neighbours. Let's see Simple take on a four-player map, here named "Tumbleweed".
As stated, the Simple connection algorithm connects players with their neighbours. The starting areas are laid out in a circle, named here 1, 2, 3, 4 - and then it connects 1-2, 2-3, 3-4 and finally 4-1. That's pretty straightforward at this point, so let's move on to a more complex connection algorithm.
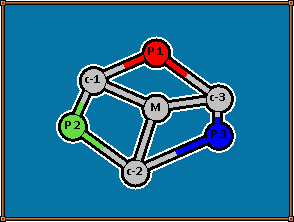
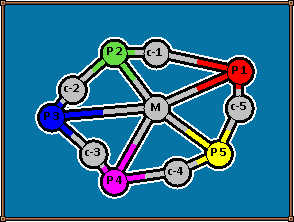
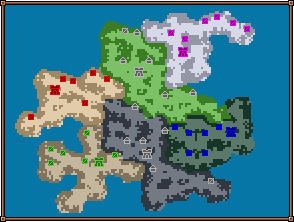
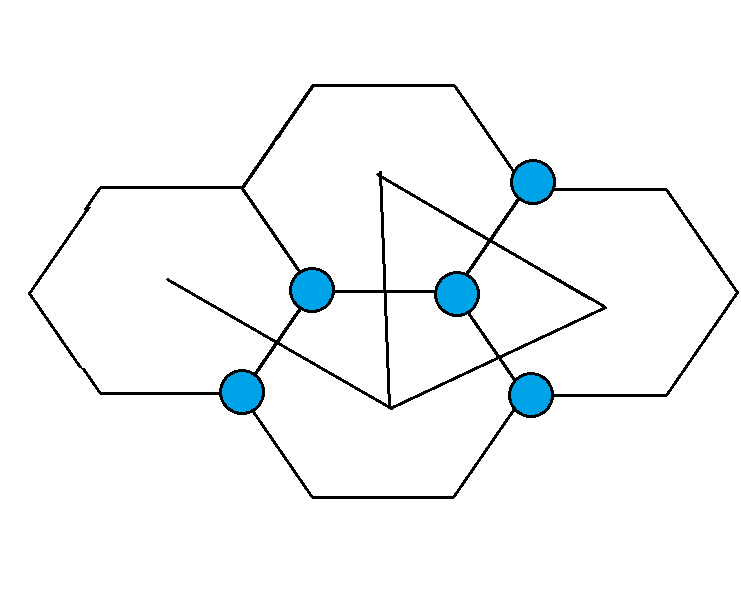
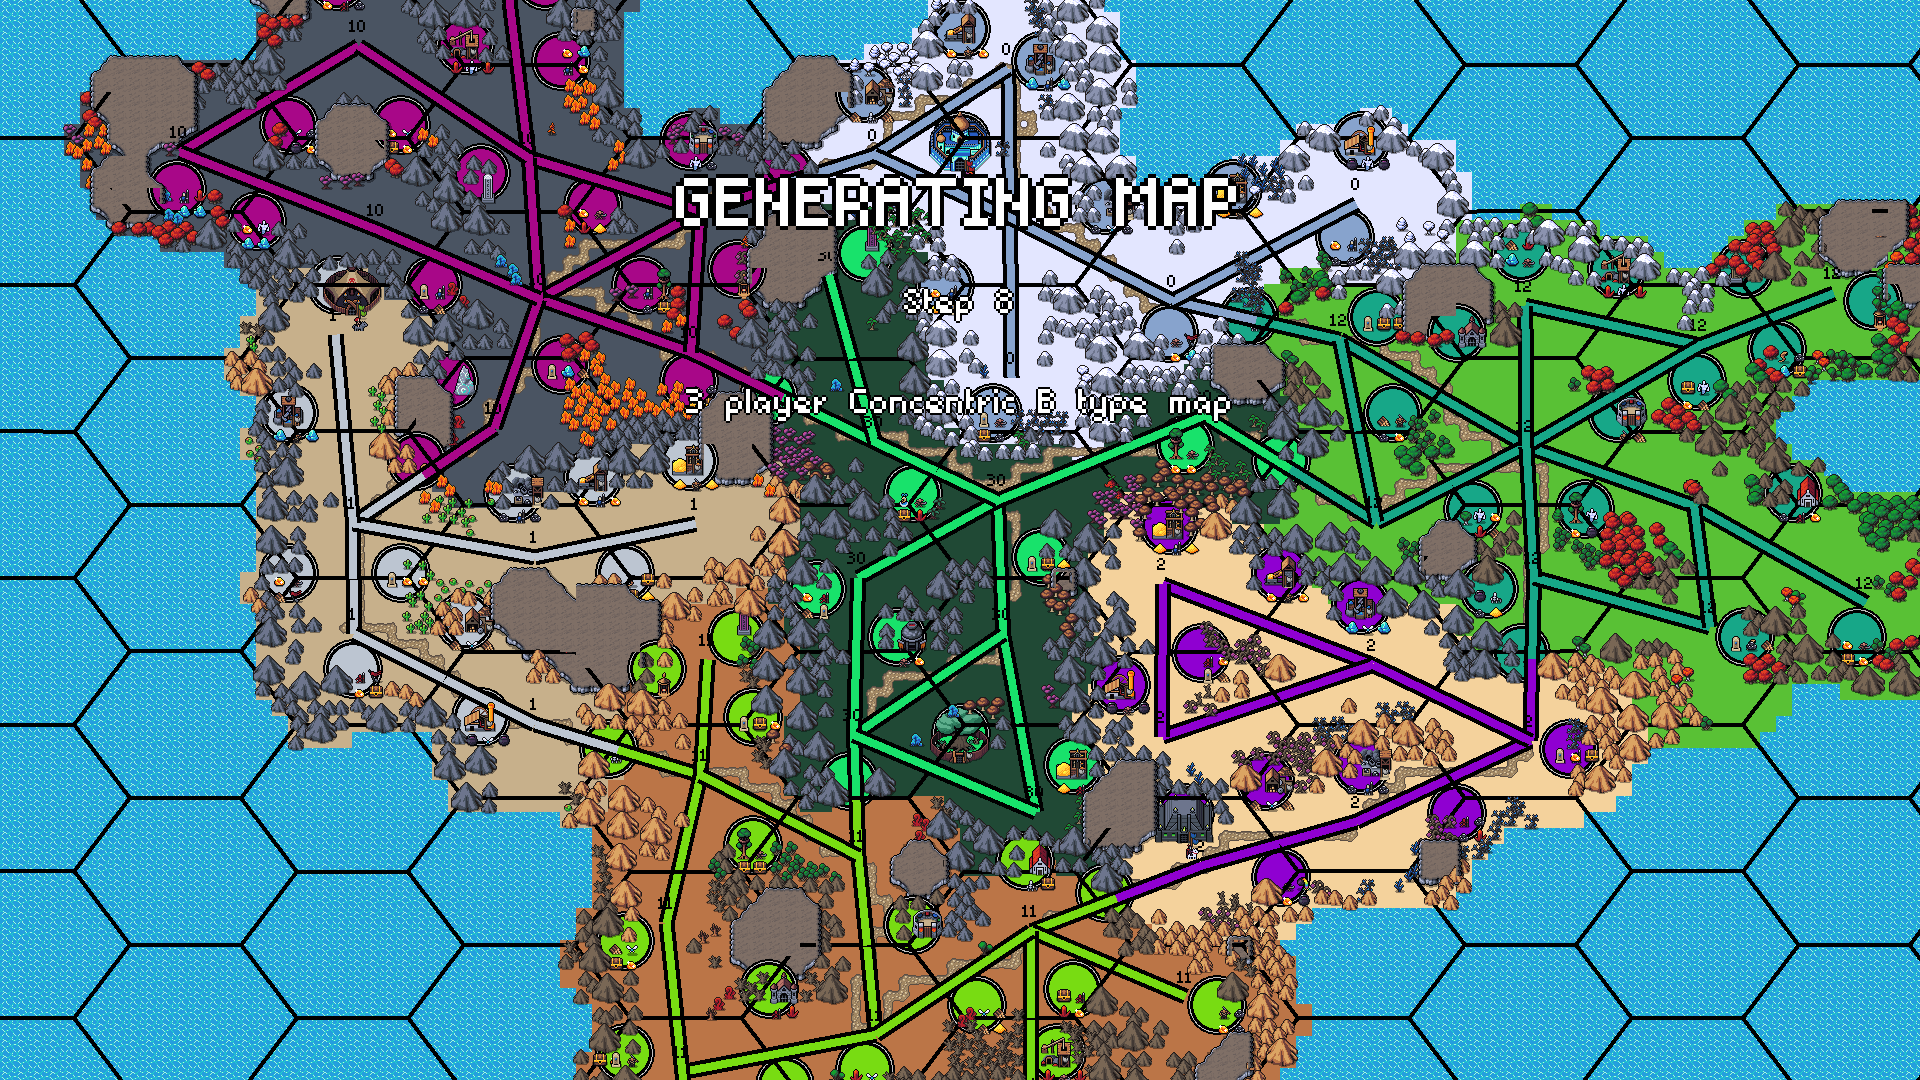
"Sands of Conquest" sports three players and seven areas. We start out with a circle like before, but this time, we insert neutral areas between each player - the areas marked C above, for connection. Finally, there is a central area placed smack dab in the middle of the map, marked M for middle. Finally, paths are constructed not only throughout the ring, but also between the C and M areas.
I name this generation algorithm Concentric B, since there's an outer ring and an inner ring (of sorts). There's another way to go about doing a concentric design, which we see below:
"Ten Towns" uses the same general layout, only with five players, and instead of having the neutral areas in the ring connect to the middle, it is the player areas that connect.
This also illustrates that the generation algorithms are robust with different player numbers. As an example, let's quickly glance over the FFA map type for different numbers of players:
The FFA map type connects all players through the middle of the map. I don't actually currently have a four-player FFA, but you can imagine how it'd look.
Most of my algorithms scale for any number of players. But then there are the bracket map types:

This is the 2v2 Bracket type match named "Forest of War". It connects two players through the a-nodes. Then finally, the a-nodes are connected too - like a championship bracket! The bracket type does not work with different player numbers, though. You cannot do a bracket for an odd number of players, the 1v1 is identical to the FFA-map type
There are two ways to do a six-player bracket type map: 2v2v2 and 3v3:

"Master of the World" showcases the 3v3 Bracket map type. It actually looks almost identical to the 2v2 version, just with one more player for each A-area.

And here, finally, the "New Heroes" map illustrating the 2v2v2 Bracket approach. Now there are three A-areas, and a single M area to connect the A areas together.
So far, we've been looking over abstract node graphs, but honestly, this is a very useful foundation for the rest of the map generation. Because in a way, that's all we need: Areas and Paths.
THE MAP FRAMEWORK
In my process, I start with splitting up the map into a bunch of hexagons. I find hexagons to be a useful tool for map generation since they tile the plane and are not square. They can easily be laid out with a for(x=0;x<W;x++) for(y=0;y<H;y++) script as long as you offset every 2nd row/column of hexagons by one half.

I set the hexagon grid up with hexagons storing terrain (water as default) and realm # (-1 as default).
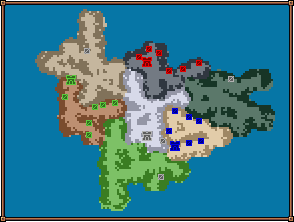
Then you just place down the areas from the node graphs above, picking a random terrain and preset realm number. Let's use "Sands of Conquest", a 3-player Concentric A type map. The P and C nodes are placed in a ring about halfway between the edge and the centre of the map. The M note is placed in the middle
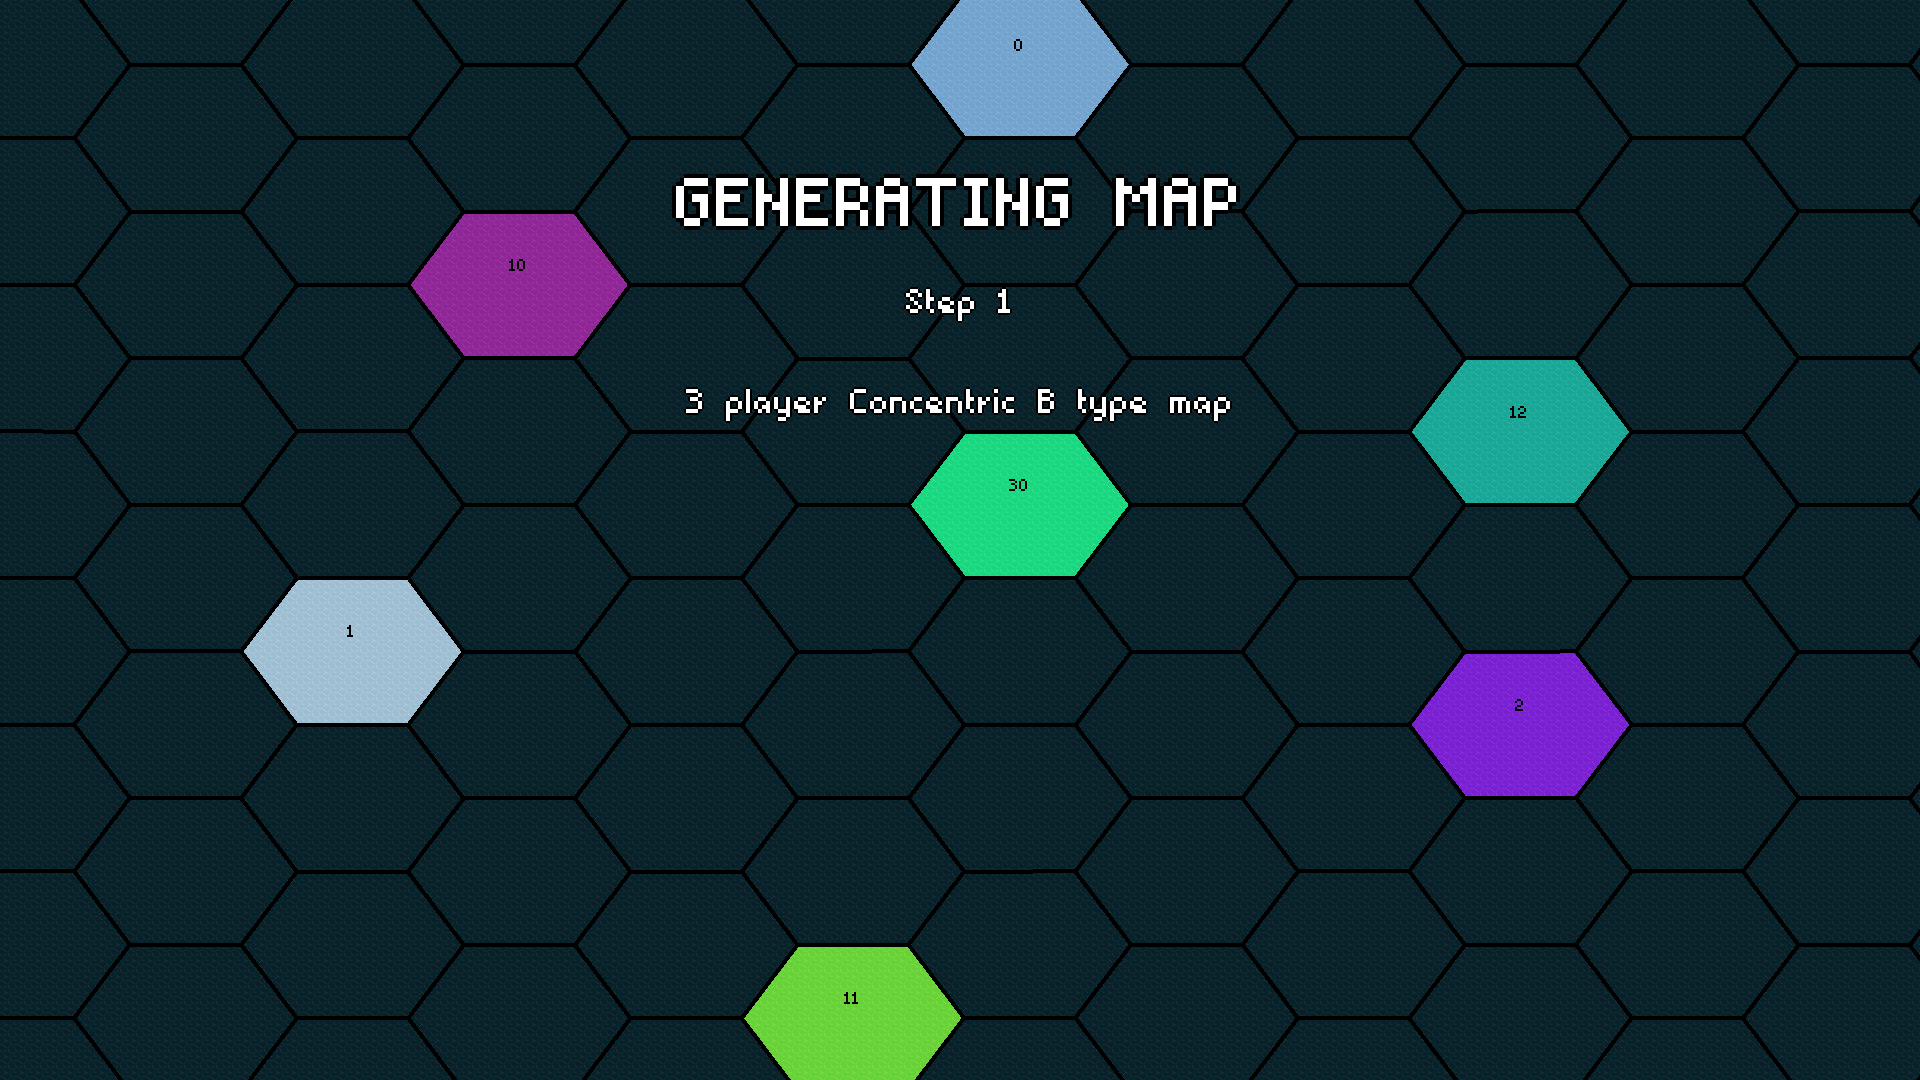
In the game, I use a slightly different numbering convention for regions than the letters above. The P-regions are numbered 0-9, the C-regions from 10-19, A-regions (from the bracket style maps) are numbered 20-29, and the middle region is 30. Importantly, all regions work identically in code, apart from a few exceptions to do with the P-regions such as castles placed there belonging to players. This number is called the realm, and once we start building out areas, all hexagons in that area all have the same realm index.
With this simple array of realms, the list of connection is just a list of number pairs. This map would require the following connections:
- 0-10
- 10-1
- 1-11
- 11-2
- 2-12
- 12-0
(for the ring)
- 10-30
- 11-30
- 12-30
(for the spokes of the wheel)
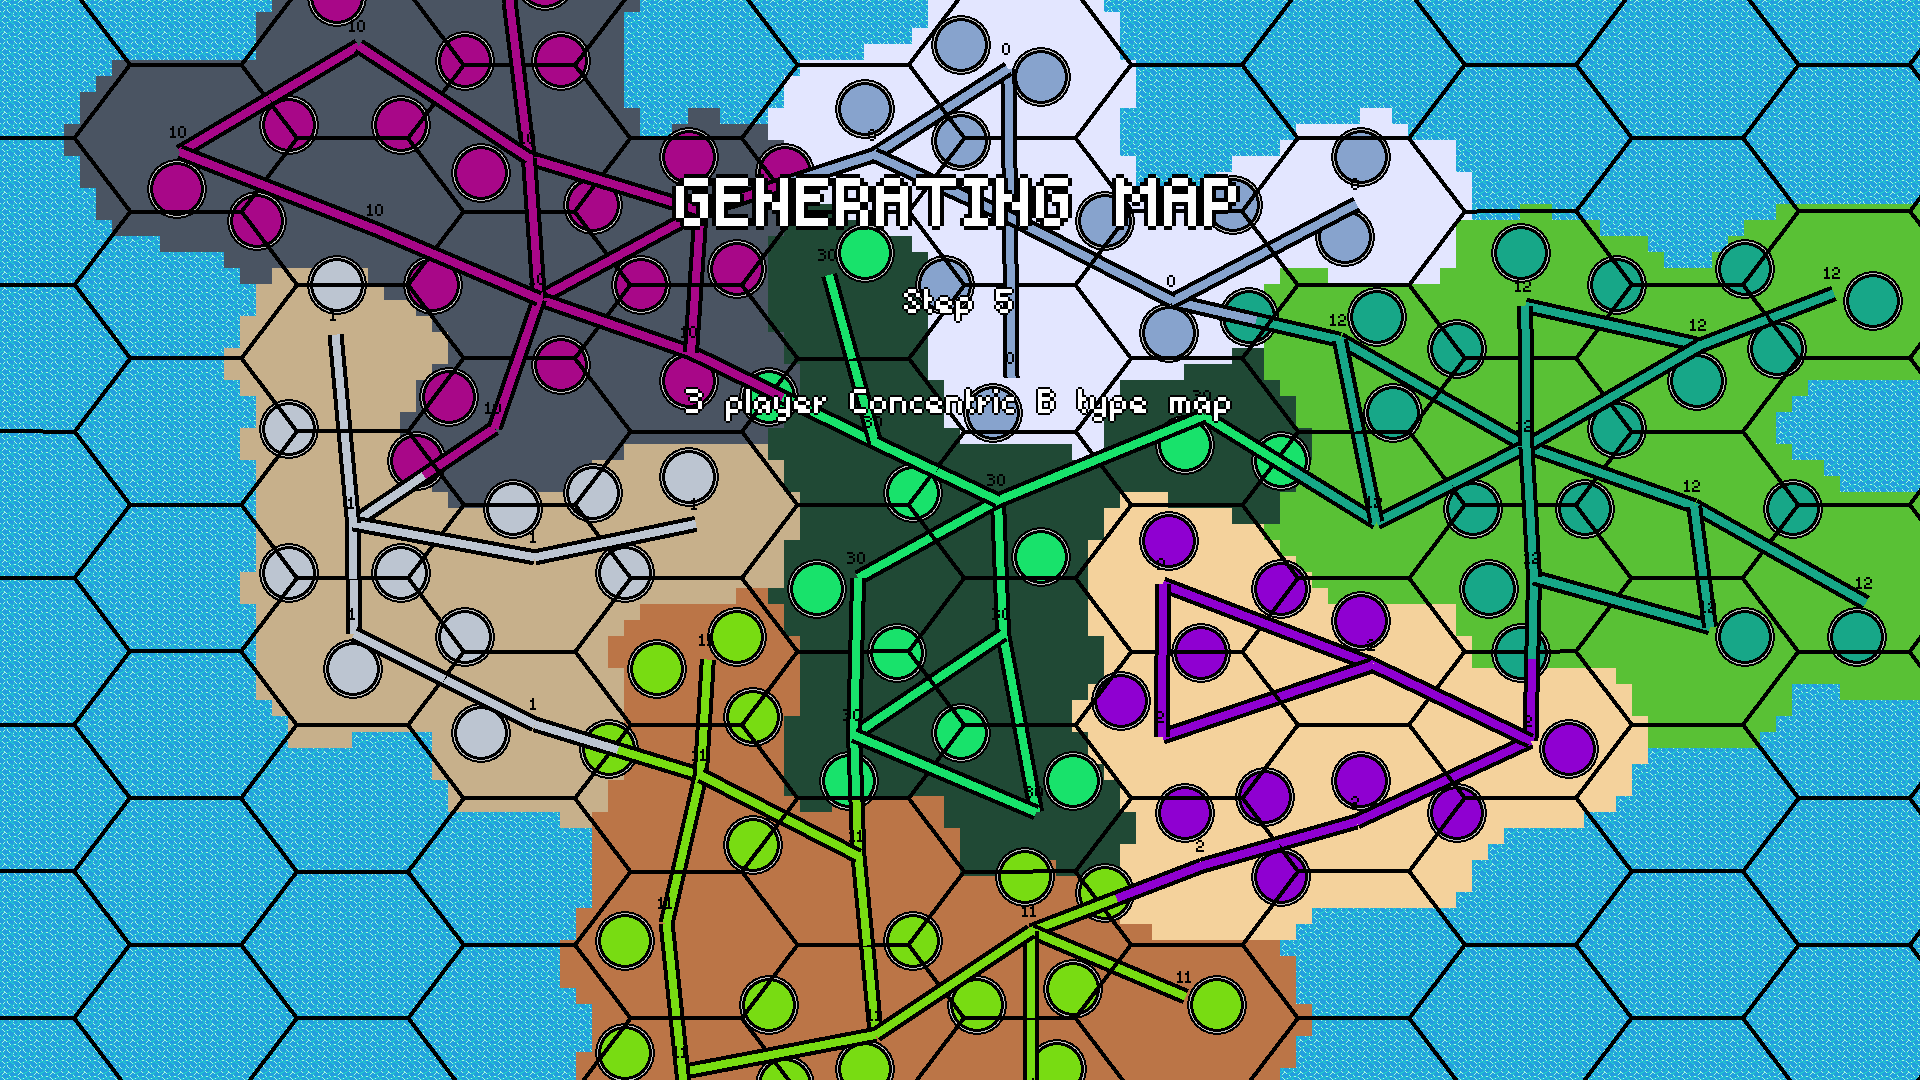
The connection script finds the two hexagons that need to be connected, then goes, one hexagon at a time, from one to the other. Along the way, it tells the hexagons it passes through to connect with each-other - and it places half of them in the starting realm and the other half in the ending realm So far, so good! As alluded to above, each hexagon keeps a list of what other hexagons it could connect to and which it does connect to. Later on, we'll be building paths between connected hexagons and walls along the edges of nonconnected hexagons.
When you start a map, you choose a size for the map. A tiny map will try to get 26 hexagons filled out, a small map 33, medium 39, large 46, huge 52, and sprawling wants 65 hexagons filled out. This number is divided across the number of areas with a few extra corrections. But our current areas up there are too small for our map, so now we will need to have the areas balloon out. Once the desired number of hexagons in each area is calculated, a script goes through each number from 0 to 50, and if an area has less hexagons than that number and than its desired number, it finds a non-claimed contiguous hexagon to spread its realm to.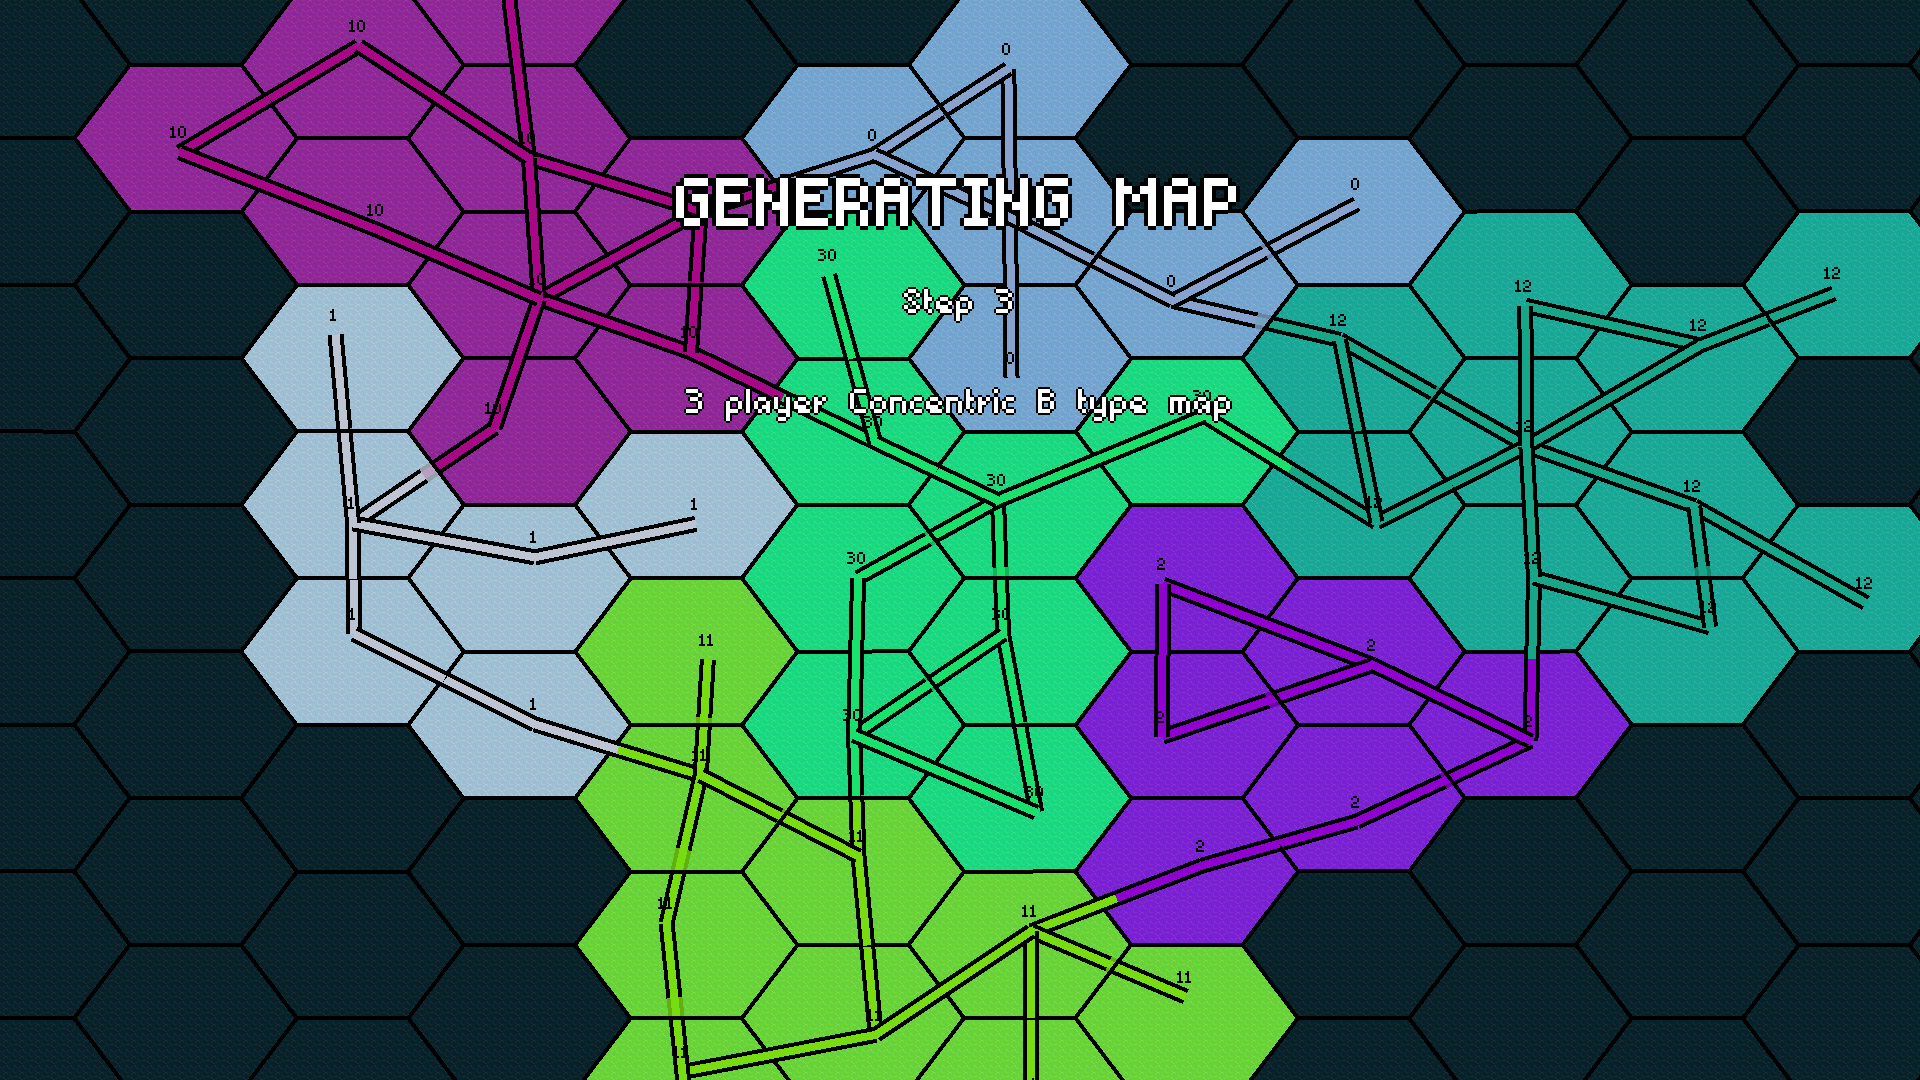 Some areas may not reach their desired size because they're getting hemmed in on either side by other areas. To combat this, I use the system of counting up from 0 to 50, so that all areas grow at the same rate instead of one area being able to gobble up several others. It's not a perfect system, but if one area is a bit too small, that doesn't ruin everything.
As soon as each area has the desired size, an extra script goes through and spawns extra connections between hexagons in the same area. This makes the map less maze-like and more varied. It will, however, avoid having a single hexagon connected to all six neighbours.
So far, we've just talked a bit about symmetry, but this becomes much more important now that we're reaching the point where we want to actually put objects on the map.

Each circle above corresponds to an adventure object - a building, a monster, some resources, or several of these at once. Adventure objects are placed over three passes - the first places potential objects at every non-connected hexagon edge:

The second places potential objects at every corner by a connected hexagon edge:
Finally, any connection between two different realms will spawn a special adventure object with priority over all other adventure objects. Because all those adventure objects placed in the steps above are just potential objects. A lot of them are removed once more by being too close to another object or for other reasons. With some added random offsets and the described culling, the final result is as seen above.
What should go in those adventure object spots then? It would easy to just make it randomized, but that would make a terrible game-play experience, and we also want the map to be symmetric - not have one play spawn 7 goldmines and the other have nothing.
Each set of realms (for instance 0-9, the player starting areas) will have their own unique list of objects. The game will then go through the list and find the best possible adventure-object-spot candidate it can find in each area, and then place it there, destroying any objects that were too close and then move on to the next.
The list is based both on:
- Preset objects - like a starting town, lumber and ore mine in player starting areas
- Varied objects - all maps have all four rare mines (crystal, mercury, gems, sulphur) for each player, but some have all four in the starting areas, others 1-3 in starting and 1-3 in second area
- Random objects - most of the adventure objects are completely random
An example for our map above, the starting area gets:
Starting Town, Lumber Mine, Ore Mine, Gold Mine, Battle Mod, Sulphur Mine, Mercury Mine, Gem Mine, Empty, Resources, Learning Stone, Battle Mod, Resources, Battle Mod, Obelisk
The secondary areas get:
Redwood, Resources, Empty, Random Adventure, Resources, Crystal Mine, Learning Stone, Empty, Resources, Resources, Resources, Empty, Resources, Random Adventure, Learning Stone, Intermediate Magic, Obelisk, Empty, Random Adventure, Empty, Resources, Learning Stone, Random Adventure, Empty, Artifact,
While the middle area gets:
Neutral Town, Battle Mod, Empty, Random Adventure, Redwood, Sulphur Mine, Obelisk, Learning Stone, Empty, Battle Mod, Empty, Resources, Battle Mod, Redwood, Battle Mod, Empty, Resources, Random Adventure, Empty, Empty,
As the list is generated, it also keeps track of the strength of monsters protecting each spot. For each area, a range of strength is defined, for instance 1-4 for starting area and 4-7 for second areas. As the list is filled in, the monsters grow from the minimum to the maximum strength.
Finally, each object has a desired placement, either upwards or downwards, which it uses to find the best possible placement. Also, though for instance the gold mine is at the start of the list, the map generator wants to place it as far out in the area as possible, while wanting to keep the lumber and ore mines close. It's never perfect, but if it were perfect, it wouldn't be random.
The most important thing to point is that this list counts for ALL the realms of the same type. So if one player starting area gets 3 battle mods and 1 obelisk, all three do!
Now we can slot in terrain. It will usually be synchronized with the matching terrain for the player starting faction. Just smack dab, iterate through every tile of the map, find the closest hexagon and pick the terrain matching the realm. Later on, we add autotiling and smoothing and junk.

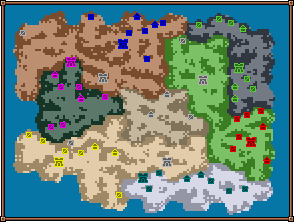
Here we actually see the objects placed down in the adventure object spots.
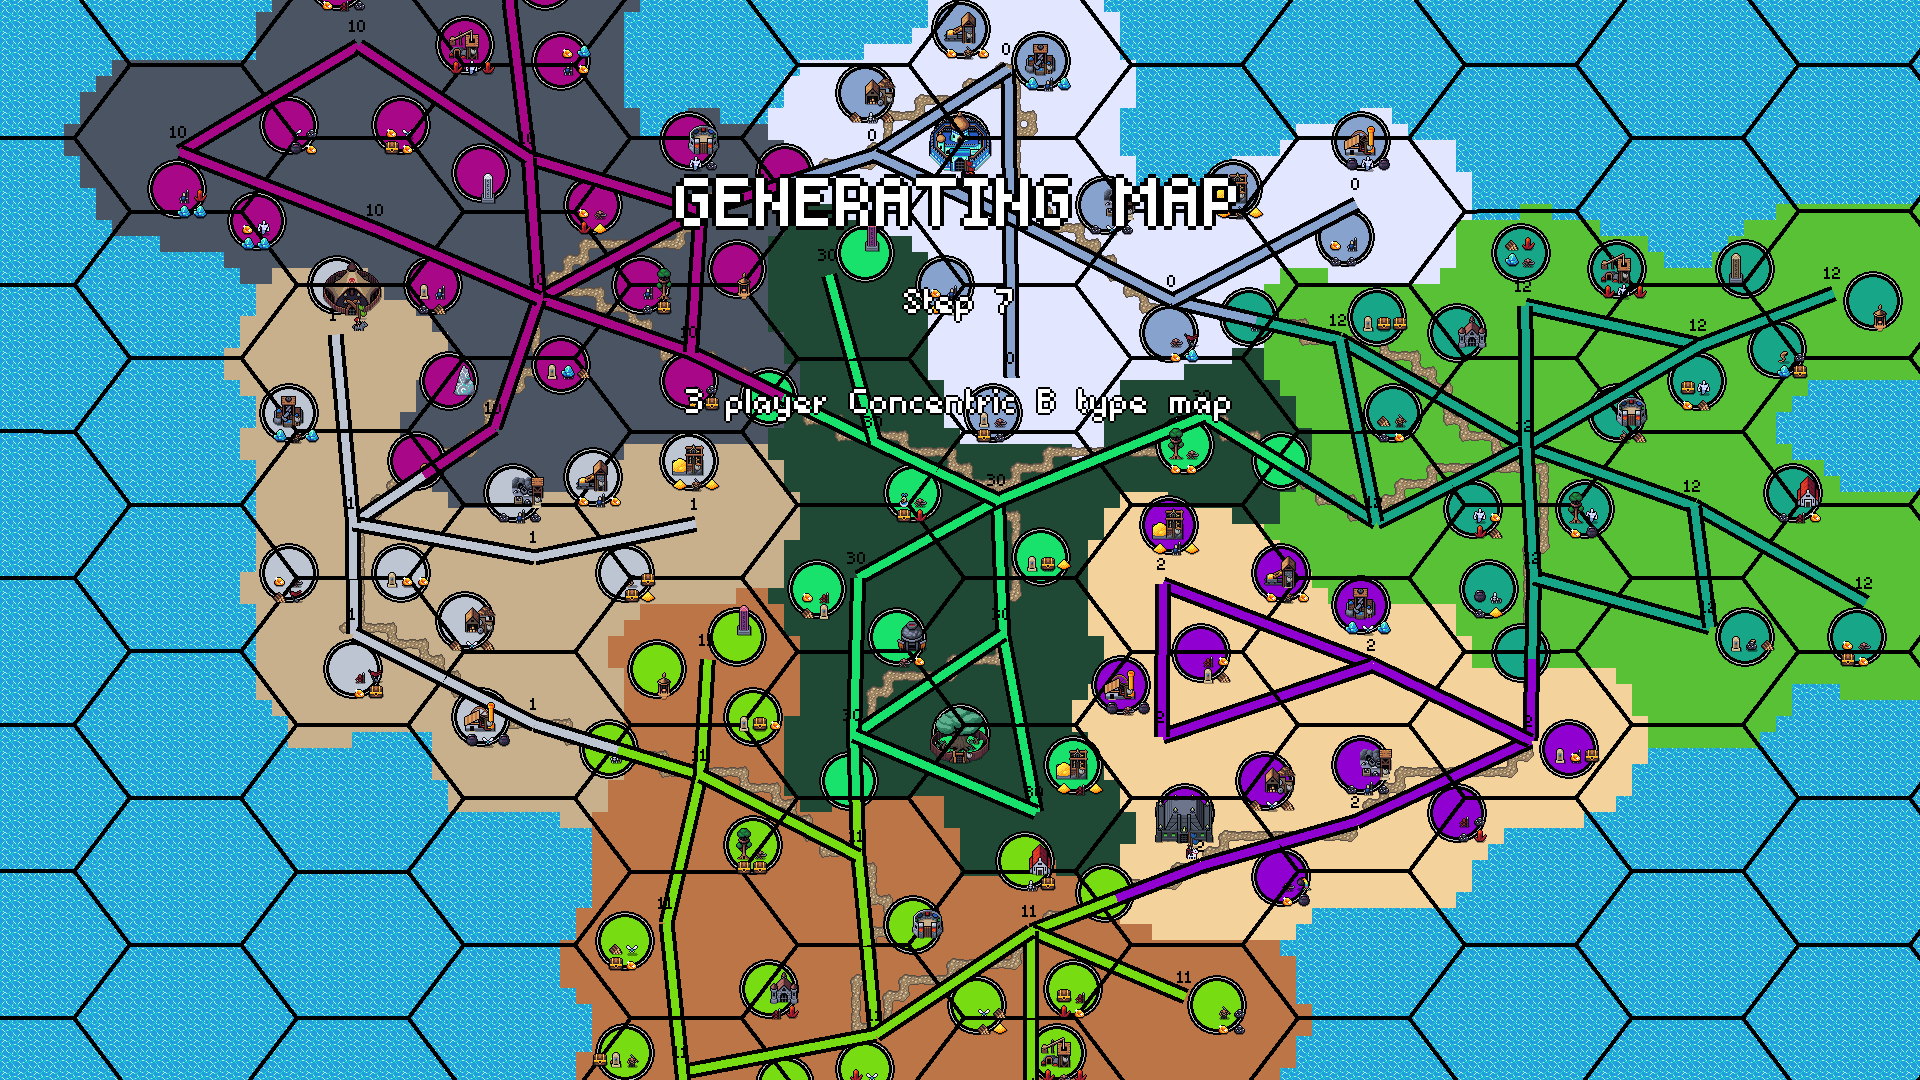
Some connections between hexagons also have the path drawn out - these were the first connections formed, when paths were built between different regions.
What you don't see is that already now, the map is deciding what parts of the map should be blocked off. "Behind" each adventure object, it designates tiles as wanting obstacles. Additionally, as described earlier, it designates all edges between non-connected hexagons as wanting obstacles. Finally, it goes through all connection and clears a path.
In code, the game map keeps a grid for placing obstacles that starts as 0 all over. Then, where obstacles are wanted as described above, the value is switched to 1. Where paths need to be clear, it writes down -1. Then a small cellular automata looks at the tiles with value 0 and switches to the value of one of its neighbours or spontaneously goes to 1. This gives the randomized edges of obstacles.

The final step creates borders between different terrains, coastlines, adds in swatches of secondary terrain (wherever the map ended up with 0 or -1 in the obstacle grids for a large enough area). And that's about it.
Finally, the whole map is covered in fog of war and the game begins!
I hope this guide helps you or inspire you to try your hand at procedural generation! If anything is unclear, I love answering questions and giving examples. You can also go and play Hero's Hour, which generates these really cool maps for several hours of play in 2-3 seconds.
Comments
Log in with itch.io to leave a comment.
What a great material, thank You for sharing this !
I would like to ask to clarify one thing :
"Once the desired number of hexagons in each area is calculated, a script goes through each number from 0 to 50, and if an area has less hexagons than that number and than its desired number, it finds a non-claimed contiguous hexagon to spread its realm to"
Realm areas seem to have nice wild irregular shapes overall, but their progress towards the middle is more regular. If the algortihm for realm proliferation was random, there might have been holes of water inbetween connected areas. Is there any trick to this non-claimed contogous hex seeking algorithm, or am I overthinking ?
Fascinating